Tuesday, February 24, 2015

Security Testing

What is Security Testing?
Security Testing is the process of identifying vulnerabilities or weaknesses in application software. It tests a live running system.

Security Testing is also known as:
- Pen testing
- Ethical hacking
- White hat testing

Security Testing find issues that impact the CIA Triad
- Confidentiality of data
- Integrity of data
- Availability of data

Security Testing often find "OWASP Top 10" vulnerabilities
- The 10 most critical web app security flaws
- OWASP(Open web application security project) is the de facto industry standard.

Why do security flaws exist?
 There is always a mismatch between target functionality and actual functionality.

OWASP Top 10
A1 - Injection
A2 - Broken Authentication and Session management
A3 - Cross Site Scripting (XSS)
A4 - Insecure Direct Object References
A5 - Security Misconfigurations
A6 - Sensitive Data Exposure
A7 - Missing Function Level Access Control
A8 - Cross Site Request Forgery (CSRF)
A9 - Using Components with Known Vulnerabilities
A10 - Unvalidated Redirects and Forwards

 Security testing needs the tester to think like a "bad guy" i.e. find security loopholes which might be exploited.
- It's about abuse cases, not use cases.
- Valid bugs are only those that affect the CIA Triad
- Bugs are often highly technical in nature

Testers need good understanding of
- HTTP Protocol
- Web app architecture
- Common data formats
-  HTML, JavaScript
- Security principles
- Vulnerability types
- Exploitability
- App development/Coding experience is invaluable
- Knowledge of special tools might be needed

 Risk-Free Security Testing

- Internet-facing sites
      - http://demo.testfire.net
      - http://zero.webappsecurity.com
      - http://crackme.cenzic.com
      - http://www.vulnweb.com

- Vulnerable web apps
      - WebGoat
      - bWAPP
      - Hackazon
      - Hacme Casino
      - Hacme Bank
   -  Linux VM bundled with vulnerable web apps
         - OWASP Broken Web App project

Automated vulnerability scanning tool
   - Give it a URL
   - Configure authentication
   - Press the "Go" button
   - Dumb / brute in force
         - Fast, good at finding certain flaws like XSS and SQL injection
         - No recognition of context
         - No recognition of sensitive data vs. unimportant data
         - No recognition of business logic flaw


Manual security testing
   - Exploratory in nature
   - Leverages human intellect
   - Simulates an attacker who is targeting your machine
   - Complements automated scanning

   Best tool for Security Testing:
      - HTTP Proxy

Popular HTTP Intercepting proxies
      - Burp Suite
      - OWASP's ZAP
      - Fiddler


Sample Get Request


Sample POST Request


Friday, February 20, 2015

Introduction to Selenium Grid

What is Selenium Grid?


Selenium Grid is a part of the Selenium Suite that specializes on running multiple tests across different browsers, operating systems, and machines in parallel.
Selenium Grid has 2 versions - the older Grid 1 and the newer Grid 2. We will only focus on Grid 2 because Grid 1 is gradually being deprecated by the Selenium Team.
Selenium Grid uses a hub-node concept where you only run the test on a single machine called a hub, but the execution will be done by different machines called nodes

When to Use Selenium Grid?

You should use Selenium Grid when you want to do either one or both of following :
  • Run your tests against different browsers, operating systems, and machines all at the same time.This will ensure that the application you are testing is fully compatible with a wide range of browser-OS combinations.
  • Save time in execution of your test suites. If you set up Selenium Grid to run, say, 4 tests at a time, then you would be able to finish the whole suite around 4 times faster.

Grid 1.0 Vs Grid 2.0

Following are the main differences between Selenium Grid 1 and 2.
Grid 1
Grid 2
Selenium Grid 1 has its own remote control that is different from the Selenium RC server. They are two different programs.
Selenium Grid 2 is now bundled with the Selenium Server jar file
You need to install and configure Apache Ant first before you can use Grid 1.
You do not need to install Apache Ant in Grid 2.
Can only support Selenium RC commands/scripts.
Can support both Selenium RC and WebDriver scripts.
You can only automate one browser per remote control.
One remote control can automate up to 5 browsers.

What is a Hub and Node?

The Hub

  • The hub is the central point where you load your tests into.
  • There should only be one hub in a grid.
  • The hub is launched only on a single machine, say, a computer whose OS is Windows 7 and whose browser is IE.
  • The machine containing the hub is where the tests will be run, but you will see the browser being automated on the node.

The Nodes

  • Nodes are the Selenium instances that will execute the tests that you loaded on the hub.
  • There can be one or more nodes in a grid.
  • Nodes can be launched on multiple machines with different platforms and browsers.
  • The machines running the nodes need not be the same platform as that of the hub.


How to Install and Use Grid 2.0?

In this section, you will use 2 machines. The first machine will be the system that will run the hub, while the other machine will run a node. For simplicity, let us call the machine where the hub runs as "Machine A" while the machine where the node runs will be "Machine B". It is also important to note their IP addresses. Let us say that Machine A has an IP address of 192.168.1.3 while Machine B has an IP of 192.168.1.4.
Step 1
Download the Selenium Server by here.
Step 2
You can place the Selenium Server .jar file anywhere in your HardDrive.But for the purpose of this tutorial, place it on the C drive of both Machine A and Machine B. After doing this, you are now done installing Selenium Grid. The following steps will launch the hub and the node.
Step 3
  • We are now going to launch a hub. Go to Machine A. Using the command prompt, navigate to the root of Machine A's - C drive ,because that is the directory where we placed the Selenium Server.
  • On the command prompt, type                                                                                          java -jar selenium-server-standalone-2.44.0.jar -role hub
  • The hub should successfully be launched. Your command prompt should look similar to the image below    
e: cd E:\Dropbox\Selenium Workspace
Step 4
Another way to verify whether the hub is running is by using a browser. Selenium Grid, by default, uses Machine A's port 4444 for its web interface. Simply open up a browser and go tohttp://localhost:4444/grid/console
Also, you can check if Machine B can access the hub's web interface by launching a browser there and going tohttp://iporhostnameofmachineA:4444/grid/console where "iporhostnameofmachineA" should be the IP address or the hostname of the machine where the hub is running. Since Machine A's IP address is 192.168.1.3, then on the browser on Machine B you should type http://192.168.1.3:4444/grid/console
http://192.168.1.240:4444/grid/console
Step 5
  • Now that the hub is already set up, we are going to launch a node. Go to Machine B and launch a command prompt there.
  • Navigate to the root of Drive C and type the code below. We used the IP address 192.168.1.3 because that is where the hub is running. We also used port 5566 though you may choose any free port number you desire.


 e: 
cd E:\Dropbox\Downloads
java -jar selenium-server-standalone-2.44.0.jar -role webdriver -hub http://192.168.1.240:4444/grid/register -port 5566

OR

 e: cd E:\Dropbox\Downloads 
java -jar selenium-server-standalone-2.44.0.jar -role node -hub http://192.168.1.240:4444/grid/register -port 5566

http://192.168.1.240:4444/grid/console

  • When you press Enter, your command prompt should be similar to the image below.

Configure the node for Firefox:

e: cd E:\Dropbox\Downloads 
java -jar selenium-server-standalone-2.44.0.jar -role node -hub http://192.168.1.240:4444/grid/register -browser browserName=firefox -port 5566 

OR
e:
cd E:\Dropbox
java -jar selenium-server-standalone-2.44.0.jar -role node -hub http://192.168.1.240:4444/grid/register -browser browserName="internet explorer" -port 5566 

OR

java -Dwebdriver.ie.driver="E:\Dropbox\Java and Selenium\IEDriverServer.exe" -jar selenium-server-standalone-2.44.0.jar -role node -hub http://192.168.1.240:4444/grid/register - maxsession 10 -browser browserName="internet explorer" -port 5566 

OR


java -Dwebdriver.chrome.driver="E:\Dropbox\Java and Selenium\chromedriver.exe" -jar selenium-server-standalone-2.44.0.jar -role node -hub http://192.168.1.240:4444/grid/register - maxsession 10 -browser browserName=chrome -port 5544

Step 6
Go to the Selenium Grid web interface and refresh the page. You should see something like this.
At this point, you have already configured a simple grid. You are now ready to run a test remotely on Machine B.

Designing Test Scripts That Can Run on the Grid

To design test scripts that will run on the grid, we need to use DesiredCapabilites and the RemoteWebDriverobjects.
  • DesiredCapabilites is used to set the type of browser and OS that we will automate
  • RemoteWebDriver is used to set which node (or machine) that our test will run against.
To use the DesiredCapabilites object, you must first import this package
To use the RemoteWebDriver object, you must import these packages.

Using the DesiredCapabilites Object

Go to the Grid's web interface and hover on an image of the browser that you want to automate. Take note of the platform and the browserName shown by the tooltip.
In this case, the platform is "XP" and the browserName is "firefox".
We will use the platform and the browserName in our WebDriver as shown below (of course you need to import the necessary packages first).

Using the RemoteWebDriver Object

Import the necessary packages for RemoteWebDriver and then pass the DesiredCapabilities object that we created above as a parameter for the RemoteWebDriver object.

Running a Sample Test Case on the Grid

Below is a simple WebDriver TestNG code that you can create in Eclipse on Machine A. Once you run it, automation will be performed on Machine B.
 The test should pass.

Summary

  • Selenium Grid is used to run multiple tests simultaneously in different browsers and platforms.
  • Grid uses the hub-node concept.
  • The hub is the central point wherein you load your tests.
  • Nodes are the Selenium instances that will execute the tests that you loaded on the hub.
  • To install Selenium Grid, you only need to download the Selenium Server jar file - the same file used in running Selenium RC tests.
  • There are 2 ways to verify if the hub is running: one was through the command prompt, and the other was through a browser
  • To run test scripts on the Grid, you should use the DesiredCapabilities and the RemoteWebDriver objects.
  • DesiredCapabilites is used to set the type of browser and OS that we will automate
  • RemoteWebDriver is used to set which node (or machine) that our test will run against.

Friday, February 13, 2015

Selenium - Grid

Selenium Grid is a tool that distributes the tests across multiple physical or virtual machines so that we can execute scripts in parallel (simultaneously). It dramatically accelerates the testing process across browsers and across platforms by giving us quick and accurate feedback.
Selenium Grid allows us to execute multiple instances of WebDriver or Selenium Remote Control tests in parallel which uses the same code base, hence the code need NOT be present on the system they execute. The selenium-server-standalone package includes Hub, WebDriver, and Selenium RC to execute the scripts in grid.
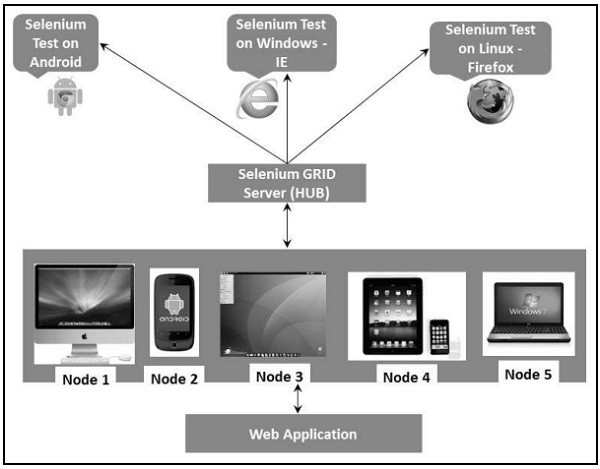
Selenium Grid has a Hub and a Node.
  • Hub - The hub can also be understood as a server which acts as the central point where the tests would be triggered. A Selenium Grid has only one Hub and it is launched on a single machine once.
  • Node - Nodes are the Selenium instances that are attached to the Hub which execute the tests. There can be one or more nodes in a grid which can be of any OS and can contain any of the Selenium supported browsers.

Architecture

The following diagram shows the architecture of Selenium Grid.
selenium_ide_121

Working with Grid

In order to work with the Grid, we need to follow certain protocols. Listen below are the major steps involved in this process:
  • Configuring the Hub
  • Configuring the Nodes
  • Develop the Script and Prepare the XML File
  • Test Execution
  • Result Analysis
Let us discuss each of these steps in detail.

Configuring the Hub

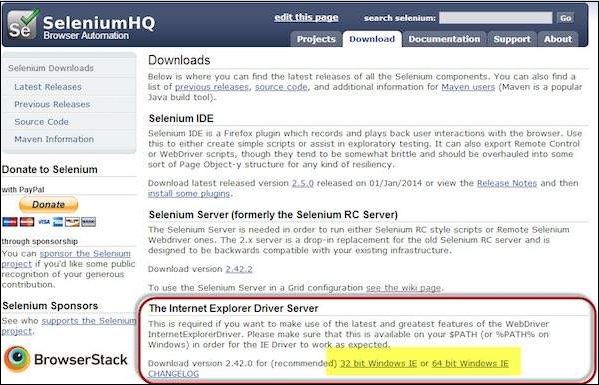
Step 1 : Download the latest Selenium Server standalone JAR file from http://docs.seleniumhq.org/download/. Download it by clicking on the version as shown below.
selenium_ide_45
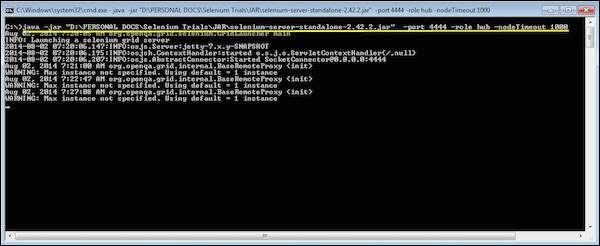
Step 2 : Start the Hub by launching the Selenium Server using the following command. Now we will use the port '4444' to start the hub.
Note : Ensure that there are no other applications that are running on port# 4444.
e:

cd E:\Dropbox\Java and Selenium
java -jar selenium-server-standalone-2.42.2.jar -port 4444 -role hub -node Timeout 1000

selenium_ide_122
Step 3 : Now open the browser and navigate to the URL http//localhost:4444 from the Hub (The system where you have executed Step#2).
selenium_ide_123
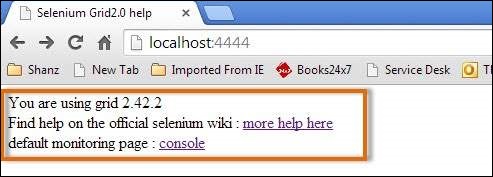
Step 4 : Now click on the 'console' link and click 'view config'. The config of the hub would be displayed as follows. As of now, we haven't got any nodes, hence we will not be able to see the details.
selenium_ide_124

Configuring the Nodes

Step 1 : Logon to the node (where you would like to execute the scripts) and place the 'selenium-server-standalone-2.42.2' in a folder. We need to point to the selenium-server-standalone JAR while launching the nodes.
Step 2 : Launch FireFox Node using the following below command.
e:
cd E:\Dropbox\Java and Selenium
java -jar selenium-server-standalone-2.42.2.jar -role node  -hub http://localhost:4444/grid/register -browser browserName=firefox -port 5555


Where,
E:\Dropbox\Java and Selenium\selenium-server-standalone-2.42.2.jar = Location of the Selenium Server Standalone Jar File(on the Node Machine)
http://localhost:4444 = IP Address of the Hub and 4444 is the port of the Hub
browserName = firefox (Parameter to specify the Browser name on Nodes)
5555 = Port on which Firefox Node would be up and running.
selenium_ide_125
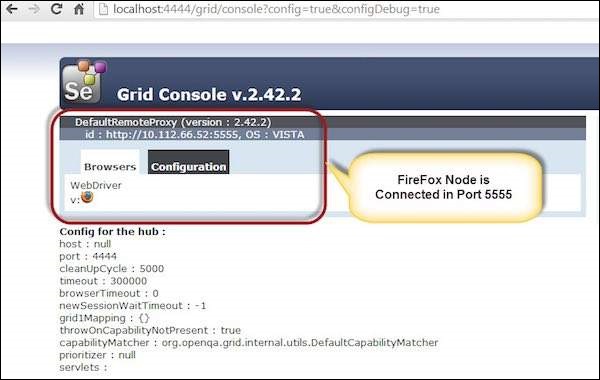
Step 3 : After executing the command, come back to the Hub. Navigate to the URL - http://localhost:4444 and the Hub would now display the node attached to it.
selenium_ide_126
Step 4 : Now let us launch the Internet Explorer Node. For launching the IE Node, we need to have the Internet Explorer driver downloaded on the node machine.
Step 5 : To download the Internet Explorer driver, navigate to http://docs.seleniumhq.org/download/ and download the appropriate file based on the architecture of your OS. After you have downloaded, unzip the exe file and place in it a folder which has to be referred while launching IE nodes.
selenium_ide_131
Step 6 : Launch IE using the following command.
c:
java -Dwebdriver.ie.driver=E:\Dropbox\Java and Selenium\IEDriverServer.exe -jar E:\Dropbox\Java and Selenium\selenium-server-standalone-2.42.2.jar -role webdriver -hub http://localhost:4444/grid/register -browser browserName=ie,platform=WINDOWS -port 5558

OR

e:
cd E:\Dropbox\Java and Selenium\
java -jar selenium-server-standalone-2.42.2.jar -role webdriver -hub http://localhost:4444/grid/register -browser browserName="internet explorer",version=11.0,platform=WINDOWS  -port 5558 -Dwebdriver.internetexplorer.driver=E:\Dropbox\Java and Selenium\IEDriverServer.exe

OR

e:
cd E:\Dropbox\Java and Selenium\
java -jar selenium-server-standalone-2.42.2.jar -role webdriver -hub http://localhost:4444/grid/register -browser browserName="ie",platform=WINDOWS  -port 5558 -Dwebdriver.internetexplorer.driver=E:\Dropbox\Java and Selenium\IEDriverServer.exe


Where,
E:\Dropbox\Java and Selenium\IEDriverServer.exe = The location of the downloaded the IE Driver(on the Node Machine)
E:\Dropbox\Java and Selenium\selenium-server-standalone-2.42.2.jar = Location of the Selenium Server Standalone Jar File(on the Node Machine)
http://localhost:4444/ = IP Address of the Hub and 4444 is the port of the Hub
browserName = ie / internet explorer (Parameter to specify the Browser name on Nodes)
5558 = Port on which IE Node would be up and running.
selenium_ide_127
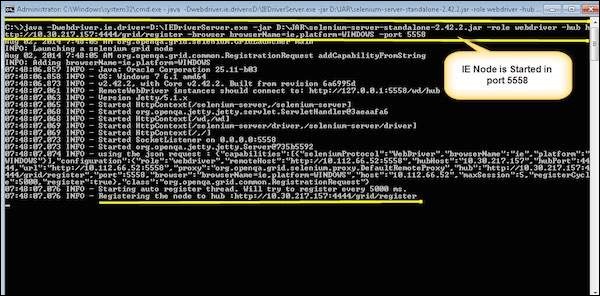
Step 7 : After executing the command, come back to the Hub. Navigate to the URL - http://10.30.217.157:4444 and the Hub would now display the IE node attached to it.
selenium_ide_128
Step 8 : Let us now launch Chrome Node. For launching the Chrome Node, we need to have the Chrome driver downloaded on the node machine.
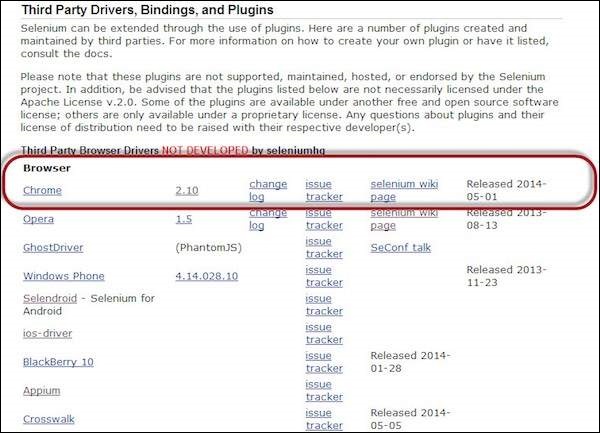
Step 9 : To download the Chrome Driver, navigate to http://docs.seleniumhq.org/download/ and then navigate to Third Party Browser Drivers area and click on the version number '2.10' as shown below.
selenium_ide_132
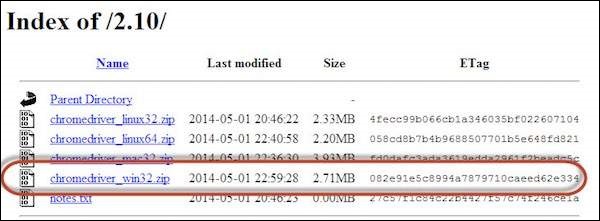
Step 10 : Download the driver based on the type of your OS. We will execute it on Windows environment, hence we will download the Windows Chrome Driver. After you have downloaded, unzip the exe file and place it in a folder which has to be referred while launching chrome nodes.
selenium_ide_133
Step 11 : Launch Chrome using the following command.
C:\>java -Dwebdriver.chrome.driver=D:\chromedriver.exe -jar D:\JAR\selenium-server-standalone-2.42.2.jar -role webdriver -hub  http://10.30.217.157:4444/grid/register -browser browserName=chrome,platform=WINDOWS -port 5557

Where,
D:\chromedriver.exe = The location of the downloaded the chrome Driver(on the Node Machine)
D:\JAR\selenium-server-standalone-2.42.2.jar = Location of the Selenium Server Standalone Jar File(on the Node Machine)
http://10.30.217.157:4444 = IP Address of the Hub and 4444 is the port of the Hub
browserName = chrome (Parameter to specify the Browser name on Nodes)
5557 = Port on which chrome Node would be up and running.
selenium_ide_129
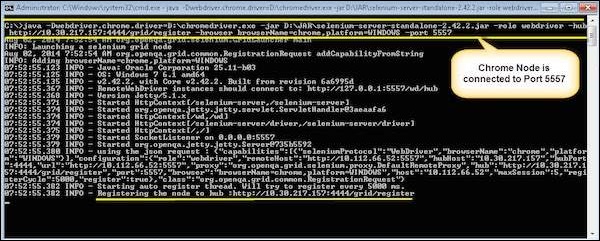
Step 12 : After executing the command, come back to the Hub. Navigate to the URL - http://10.30.217.157:4444 and the Hub would now display the chrome node attached to it.
selenium_ide_130

Develop the Script and Prepare the XML File

Step 1 : We will develop a test using TestNG. In the following example, we will launch each one of those browsers using remote webDriver. It can pass on their capabilities to the driver so that the driver has all information to execute on Nodes.
The Browser Parameter would be passed from the "XML" file.
package TestNG;

import org.openqa.selenium.*;
import org.openqa.selenium.remote.RemoteWebDriver;
import org.openqa.selenium.remote.DesiredCapabilities;

import org.testng.annotations.AfterTest;
import org.testng.annotations.BeforeTest;
import org.testng.annotations.Parameters;
import org.testng.annotations.Test;

import java.net.URL;
import java.util.concurrent.TimeUnit;
import java.net.MalformedURLException;

public class TestNGClass
{
   public WebDriver driver;
   public String URL, Node;
   protected ThreadLocal<RemoteWebDriver> threadDriver = null;
   
   @Parameters("browser")
   @BeforeTest
   public void launchapp(String browser) throws MalformedURLException
   {
      String URL = "http://www.calculator.net";
      
      if (browser.equalsIgnoreCase("firefox"))
      {
         System.out.println(" Executing on FireFox");
         String Node = "http://10.112.66.52:5555/wd/hub";
         DesiredCapabilities cap = DesiredCapabilities.firefox();
         cap.setBrowserName("firefox");
         
         driver = new RemoteWebDriver(new URL(Node), cap);
         // Puts an Implicit wait, Will wait for 10 seconds before throwing exception
         driver.manage().timeouts().implicitlyWait(10, TimeUnit.SECONDS);
         
         // Launch website
         driver.navigate().to(URL);
         driver.manage().window().maximize();
      }
      else if (browser.equalsIgnoreCase("chrome"))
      {
         System.out.println(" Executing on CHROME");
         DesiredCapabilities cap = DesiredCapabilities.chrome();
         cap.setBrowserName("chrome");
         String Node = "http://10.112.66.52:5557/wd/hub";
         driver = new RemoteWebDriver(new URL(Node), cap);
         driver.manage().timeouts().implicitlyWait(10, TimeUnit.SECONDS);
         
         // Launch website
         driver.navigate().to(URL);
         driver.manage().window().maximize();
      }
      else if (browser.equalsIgnoreCase("ie"))
      {
         System.out.println(" Executing on IE");
         DesiredCapabilities cap = DesiredCapabilities.chrome();
         cap.setBrowserName("ie");
         String Node = "http://10.112.66.52:5558/wd/hub";
         driver = new RemoteWebDriver(new URL(Node), cap);
         driver.manage().timeouts().implicitlyWait(10, TimeUnit.SECONDS);
         
         // Launch website
         driver.navigate().to(URL);
         driver.manage().window().maximize();
      }
      else
      {
         throw new IllegalArgumentException("The Browser Type is Undefined");
      }
   }
   
   @Test
   public void calculatepercent()
   {
      // Click on Math Calculators
      driver.findElement(By.xpath(".//*[@id='menu']/div[3]/a")).click();      
      // Click on Percent Calculators
      driver.findElement(By.xpath(".//*[@id='menu']/div[4]/div[3]/a")).click();
      // Enter value 10 in the first number of the percent Calculator
      driver.findElement(By.id("cpar1")).sendKeys("10");
      // Enter value 50 in the second number of the percent Calculator
      driver.findElement(By.id("cpar2")).sendKeys("50");
      
      // Click Calculate Button driver.findElement(By.xpath(".//*[@id='content']/table/tbody/tr/td[2]/input")).click();
      // Get the Result Text based on its xpath
      String result = driver.findElement(By.xpath(".//*[@id='content']/p[2]/span/font/b")).getText();
      // Print a Log In message to the screen
      System.out.println(" The Result is " + result);
      if(result.equals("5"))
      {
         System.out.println(" The Result is Pass");
      }
      else
      {
         System.out.println(" The Result is Fail");
      }
   }
   
   @AfterTest
   public void closeBrowser()
   {
      driver.quit();
   }
}
Step 2 : The Browser parameter will be passed using XML. Create an XML under the project folder.
selenium_ide_134
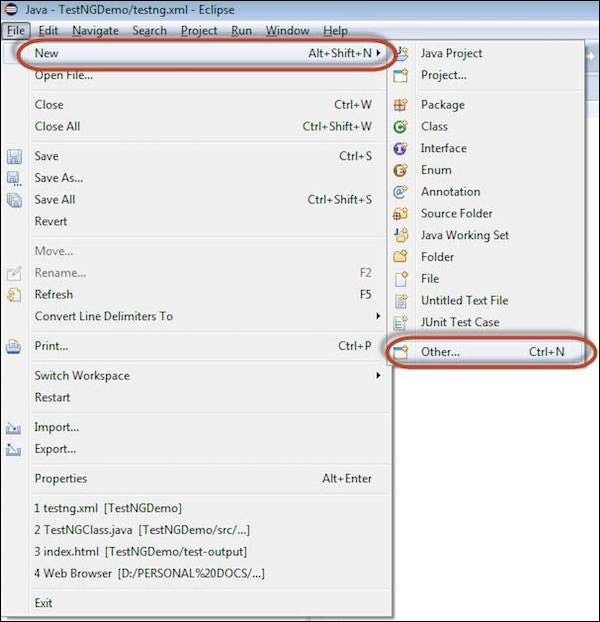
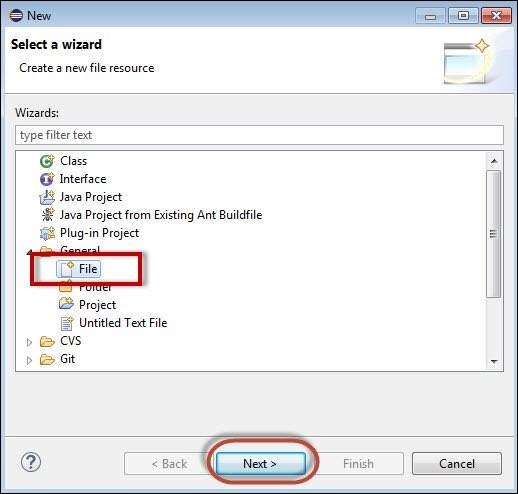
Step 3 : Select 'File' from 'General' and click 'Next'.
selenium_ide_135
Step 4 : Enter the name of the file and click 'Finish'.
selenium_ide_136
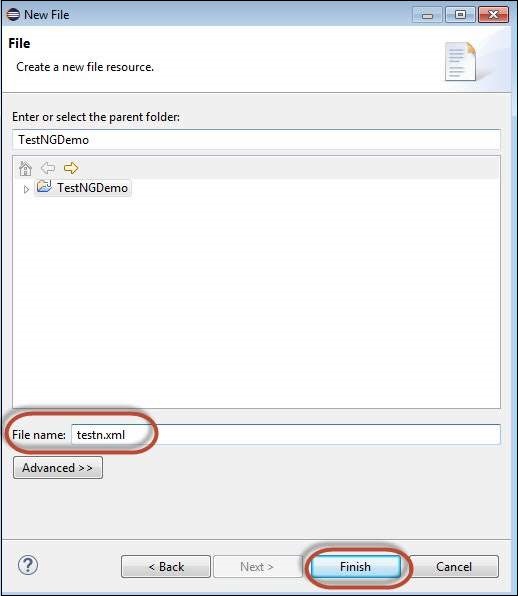
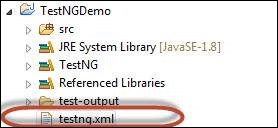
Step 5 : TestNg.XML is created under the project folder as shown below.
selenium_ide_137
Step 6 : The contents of the XML file are shown below. We create 3 tests and put them in a suite and mention parallel="tests" so that all the tests would be executed in parallel.
<?xml version="1.0" encoding="UTF-8"?>
<!DOCTYPE suite SYSTEM "http://testng.org/testng-1.0.dtd">
<suite name="Suite" parallel="tests">

   <test name="FirefoxTest">
   <parameter name="browser" value="firefox" />
      <classes>
         <class name="TestNG.TestNGClass" />
      </classes>
   </test>

   <test name="ChromeTest">
   <parameter name="browser" value="chrome" />
      <classes>
         <class name="TestNG.TestNGClass" />
      </classes>
   </test>

   <test name="IETest">
   <parameter name="browser" value="ie" />
      <classes>
         <class name="TestNG.TestNGClass" />
      </classes>
   </test>
   
</suite>

Test Execution

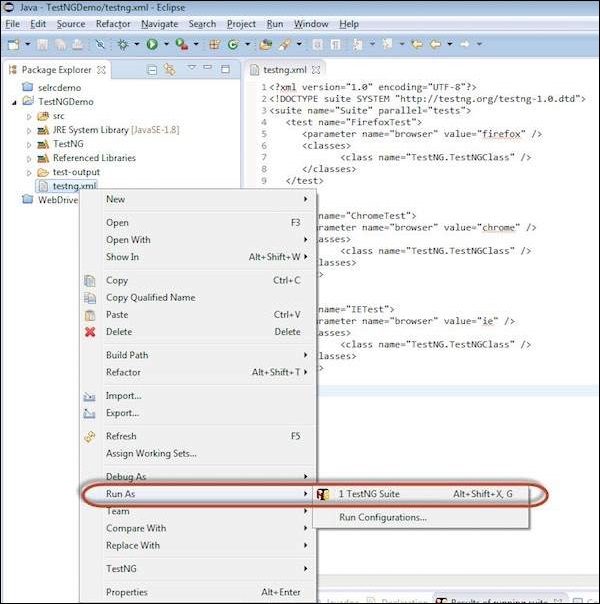
Step 1 : Select the created XML; right-click and choose 'Run As' >> 'TestNG Suite'.
selenium_ide_139
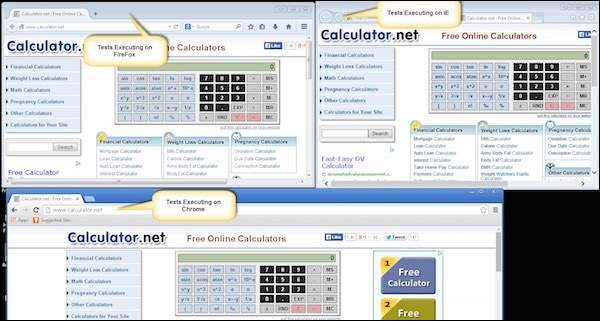
Step 2 : Now open the Node, where we have launched all the browser nodes. You will see all the three browsers in execution simultaneously.
selenium_ide_140

Result Analysis

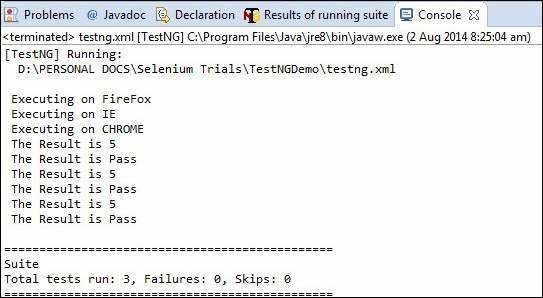
Step 1 : Upon completing the execution, we can analyze the result like any other execution. The result summary is printed in the console as shown in the following snapshot.
selenium_ide_142
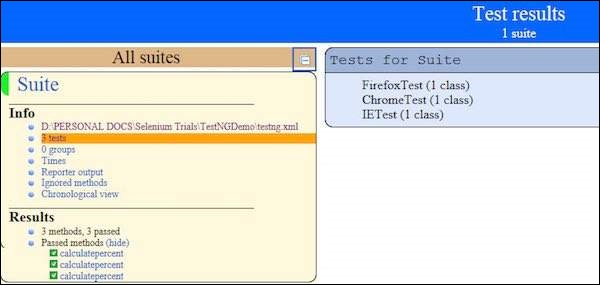
Step 2 : Navigate to the 'Results of Running Suite' Tab and TestNG would display the result summary as shown below.
selenium_ide_141
Step 3 : Upon generating the HTML, we will be able to see the test results in HTML format.
selenium_ide_143

Thursday, February 12, 2015

Selenium grid for Selenium 1.0 and Webdriver

Introduction

Grid allows you to :
  • scale by distributing tests on several machines ( parallel execution )
  • manage multiple environments from a central point, making it easy to run the tests against a vast combination of browsers / OS.
  • minimize the maintenance time for the grid by allowing you to implement custom hooks to leverage virtual infrastructure for instance.

Quick Start

This example will show you how to start the Selenium 2 Hub, and register both a WebDriver node and a Selenium 1 RC legacy node. We’ll also show you how to call the grid from Java. The hub and nodes are shown here running on the same machine, but of course you can copy the selenium-server-standalone to multiple machines.
Note: The selenium-server-standalone package includes the Hub, WebDriver, and legacy RC needed to run the grid. Ant is not required anymore. You can download the selenium-server-standalone-*.jar from http://code.google.com/p/selenium/downloads/list. This walk-through assumes you already have Java installed.

Step 1: Start the hub
The Hub is the central point that will receive all the test request and distribute them the the right nodes.
Open a command prompt and navigate to the directory where you copied the selenium-server-standalone file. Type the following command:
java -jar selenium-server-standalone-2.14.0.jar -role hub
The hub will automatically start-up using port 4444 by default. To change the default port, you can add the optional parameter -port when you run the command. You can view the status of the hub by opening a browser window and navigating to: http://localhost:4444/grid/console

Step 2: Start the nodes
Regardless on whether you want to run a grid with new WebDriver functionality, or a grid with Selenium 1 RC functionality, or both at the same time, you use the same selenium-server-standalone jar file to start the nodes.
java -jar selenium-server-standalone-2.14.0.jar -role node  -hub http://localhost:4444/grid/register
Note: The port defaults to 5555 if not specified whenever the "-role" option is provided and is not hub.
For backwards compatibility "wd" and "rc" roles are still a valid subset of the "node" role. But those roles limit the types of remote connections to their corresponding API, while "node" allows both RC and WebDriver remote connections.

Using grid to run tests

( using java as an example ) Now that the grid is in-place, we need to access the grid from our test cases. For the Selenium 1 RC nodes, you can continue to use the DefaultSelenium object and pass in the hub information:
Selenium selenium = new DefaultSelenium(“localhost”, 4444, “*firefox”, http://www.google.com”);
For WebDriver nodes, you will need to use the RemoteWebDriver and the DesiredCapabilities object to define which browser, version and platform you wish to use. Create the target browser capabilities you want to run the tests against:
DesiredCapabilities capability = DesiredCapabilities.firefox();
Pass that into the RemoteWebDriver object:
WebDriver driver = new RemoteWebDriver(new URL("http://localhost:4444/wd/hub"), capability);
The hub will then assign the test to a matching node.
A node matches if all the requested capabilities are met. To request specific capabilities on the grid, specify them before passing it into the WebDriver object.
capability.setBrowserName();
capability.setPlatform();
capability.setVersion()
capability.setCapability(,);
Example: A node registered with the setting:
 -browser  browserName=firefox,version=3.6,platform=LINUX
will be a match for:
capability.setBrowserName(“firefox ); 
capability.setPlatform(“LINUX”);  
capability.setVersion(“3.6”);
and would also be a match for
capability.setBrowserName(“firefox ); 
capability.setVersion(“3.6”);
The capabilities that are not specified will be ignored. If you specify capabilities that do not exist on your grid (for example, your test specifies Firefox version 4.0, but have no Firefox 4 instance) then there will be no match and the test will fail to run.

Configuring the nodes

The node can be configured in 2 different ways; one is by specifying command line parameters, the other is by specifying a json file.

Configuring the nodes by command line

By default, this starts 11 browsers : 5 Firefox, 5 Chrome, 1 Internet Explorer. The maximum number of concurrent tests is set to 5 by default. To change this and other browser settings, you can pass in parameters to each -browser switch (each switch represents a node based on your parameters). If you use the -browser parameter, the default browsers will be ignored and only what you specify command line will be used.
-browser browserName=firefox,version=3.6,maxInstances=5,platform=LINUX
This setting starts 5 Firefox 3.6 nodes on a linux machine.
If your remote machine has multiple versions of Firefox you’d like to use, you can map the location of each binary to a particular version on the same machine:
-browser browserName=firefox,version=3.6,firefox_binary=/home/myhomedir/firefox36/firefox,maxInstances=3,platform=LINUX -browser browserName=firefox,version=4,firefox_binary=/home/myhomedir/firefox4/firefox,maxInstances=4,platform=LINUX
Tip: If you need to provide a space somewhere in your browser parameters, then surround the parameters with quotation marks:
-browser browserName=firefox,version=3.6,firefox_binary=c:\Program Files\firefox ,maxInstances=3, platform=WINDOWS

Optional parameters

  • -port 4444 (4444 is default)
  • -timeout 30 (300 is default) The timeout in seconds before the hub automatically releases a node that hasn't received any requests for more than the specified number of seconds. After this time, the node will be released for another test in the queue. This helps to clear client crashes without manual intervention. To remove the timeout completely, specify -timeout 0 and the hub will never release the node.
Note: This is NOT the WebDriver timeout for all ”wait for WebElement” type of commands.
  • -maxSession 5 (5 is default) The maximum number of browsers that can run in parallel on the node. This is different from the maxInstance of supported browsers (Example: For a node that supports Firefox 3.6, Firefox 4.0  and Internet Explorer 8, maxSession=1 will ensure that you never have more than 1 browser running. With maxSession=2 you can have 2 Firefox tests at the same time, or 1 Internet Explorer and 1 Firefox test).
  • -browser < params > If -browser is not set, a node will start with 5 firefox, 1 chrome, and 1 internet explorer instance (assuming it’s on a windows box). This parameter can be set multiple times on the same line to define multiple types of browsers.
Parameters allowed for -browser: browserName={android, chrome, firefox, htmlunit, internet explorer, iphone, opera} version={browser version} firefox_binary={path to executable binary} chrome_binary={path to executable binary} maxInstances={maximum number of browsers of this type} platform={WINDOWS, LINUX, MAC}
  • -registerCycle = how often in ms the node will try to register itself again.Allow to restart the hub without having to restart the nodes.
  • Relly large (>50 node) Hub installations may need to increase the jetty threads by setting -DPOOL_MAX=512 (or larger) on the java command line.

Configuring timeouts (Version 2.21 required)

Timeouts in the grid should normally be handled through webDriver.manage().timeouts(), which will control how the different operations time out.
To preserve run-time integrity of a grid with selenium-servers, there are two other timeout values that can be set.
On the hub, setting the -timeout command line option to "30" seconds will ensure all resources are reclaimed 30 seconds after a client crashes. On the hub you can also set -browserTimeout 60 to make the maximum time a node is willing to hang inside the browser 60 seconds. This will ensure all resources are reclaimed slightly after 60 seconds. All the nodes use these two values from the hub if they are set. Locally set parameters on a single node has precedence, it is generally recommended not to set these timeouts on the node.
The browserTimeout should be:
  • Higher than the socket lock timeout (45 seconds)
  • Generally higher than values used in webDriver.manage().timeouts(), since this mechanism is a "last line of defense".

Configuring the nodes by JSON

java -jar selenium-server-standalone.jar -role node -nodeConfig nodeconfig.json

Configuring the hub by JSON

java -jar selenium-server-standalone.jar -role hub -hubConfig hubconfig.json

Hub diagnostic messages

Upon detecting anomalious usage patterns, the hub can give the following message:
Client requested session XYZ that was terminated due to REASON
ReasonCause/fix
TIMEOUTThe session timed out because the client did not access it within the timeout. If the client has been somehow suspended, this may happen when it wakes up
BROWSER_TIMEOUTThe node timed out the browser because it was hanging for too long (parameter browserTimeout)
ORPHANA client waiting in queue has given up once it was offered a new session
CLIENT_STOPPED_SESSIONThe session was stopped using an ordinary call to stop/quit on the client. Why are you using it again??
CLIENT_GONEThe client process (your code) appears to have died or otherwise not responded to our requests, intermittent network issues may also cause
FORWARDING_TO_NODE_FAILEDThe hub was unable to forward to the node. Out of memory errors/node stability issues or network problems
CREATIONFAILEDThe node failed to create the browser. This can typically happen when there are environmental/configuration problems on the node. Try using the node directly to track problem.
PROXY_REREGISTRATIONThe session has been discarded because the node has re-registered on the grid (in mid-test)

Tips for running with grid

If your tests are running in parallel, make sure that each thread deallocates its webdriver resource independently of any other tests running on other threads. Starting 1 browser per thread at the start of the test-run and deallocating all browsers at the end is not a good idea. (If one test-case decides to consume abnormal amounts of time you may get timeouts on all the other tests because they're waiting for the slow test. This can be very confusing)