Selenium Grid is a tool that distributes the tests across multiple physical or virtual machines so that we can execute scripts in parallel (simultaneously). It dramatically accelerates the testing process across browsers and across platforms by giving us quick and accurate feedback.
Selenium Grid allows us to execute multiple instances of WebDriver or Selenium Remote Control tests in parallel which uses the same code base, hence the code need NOT be present on the system they execute. The selenium-server-standalone package includes Hub, WebDriver, and Selenium RC to execute the scripts in grid.
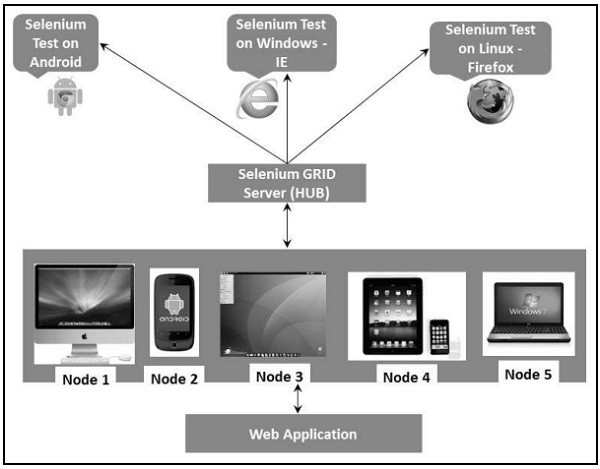
Selenium Grid has a Hub and a Node.
- Hub - The hub can also be understood as a server which acts as the central point where the tests would be triggered. A Selenium Grid has only one Hub and it is launched on a single machine once.
- Node - Nodes are the Selenium instances that are attached to the Hub which execute the tests. There can be one or more nodes in a grid which can be of any OS and can contain any of the Selenium supported browsers.
Architecture
The following diagram shows the architecture of Selenium Grid.
Working with Grid
In order to work with the Grid, we need to follow certain protocols. Listen below are the major steps involved in this process:
- Configuring the Hub
- Configuring the Nodes
- Develop the Script and Prepare the XML File
- Test Execution
- Result Analysis
Let us discuss each of these steps in detail.
Configuring the Hub
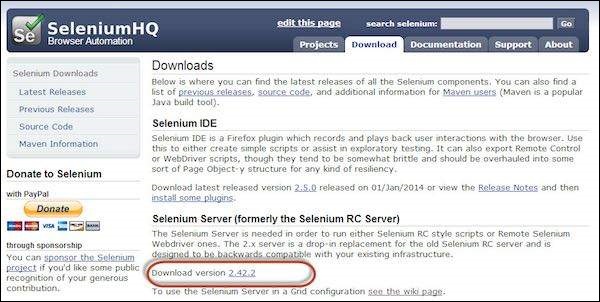
Step 1 : Download the latest Selenium Server standalone JAR file from http://docs.seleniumhq.org/download/. Download it by clicking on the version as shown below.
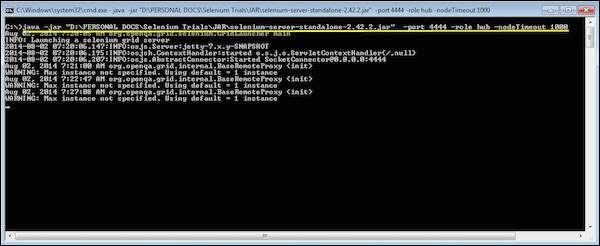
Step 2 : Start the Hub by launching the Selenium Server using the following command. Now we will use the port '4444' to start the hub.
Note : Ensure that there are no other applications that are running on port# 4444.
e:

cd E:\Dropbox\Java and Selenium
java -jar selenium-server-standalone-2.42.2.jar -port 4444 -role hub -node Timeout 1000
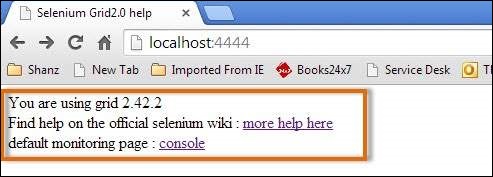
Step 3 : Now open the browser and navigate to the URL http//localhost:4444 from the Hub (The system where you have executed Step#2).
Step 4 : Now click on the 'console' link and click 'view config'. The config of the hub would be displayed as follows. As of now, we haven't got any nodes, hence we will not be able to see the details.
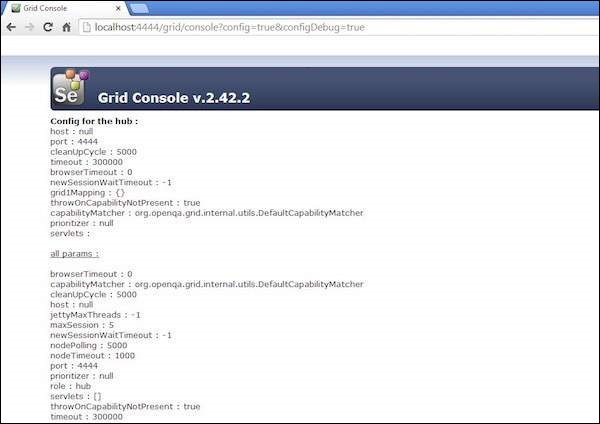
Configuring the Nodes
Step 1 : Logon to the node (where you would like to execute the scripts) and place the 'selenium-server-standalone-2.42.2' in a folder. We need to point to the selenium-server-standalone JAR while launching the nodes.
Step 2 : Launch FireFox Node using the following below command.
e:
cd E:\Dropbox\Java and Selenium
java -jar selenium-server-standalone-2.42.2.jar -role node  -hub http://localhost:4444/grid/register -browser browserName=firefox -port 5555


Where,
E:\Dropbox\Java and Selenium\selenium-server-standalone-2.42.2.jar = Location of the Selenium Server Standalone Jar File(on the Node Machine)
http://localhost:4444 = IP Address of the Hub and 4444 is the port of the Hub
browserName = firefox (Parameter to specify the Browser name on Nodes)
5555 = Port on which Firefox Node would be up and running.

Step 3 : After executing the command, come back to the Hub. Navigate to the URL - http://localhost:4444 and the Hub would now display the node attached to it.
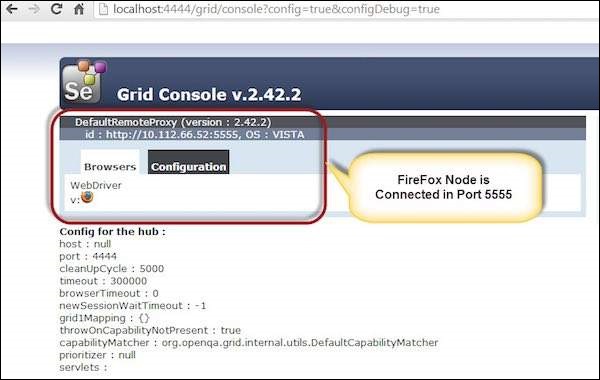
Step 4 : Now let us launch the Internet Explorer Node. For launching the IE Node, we need to have the Internet Explorer driver downloaded on the node machine.
Step 5 : To download the Internet Explorer driver, navigate to http://docs.seleniumhq.org/download/ and download the appropriate file based on the architecture of your OS. After you have downloaded, unzip the exe file and place in it a folder which has to be referred while launching IE nodes.
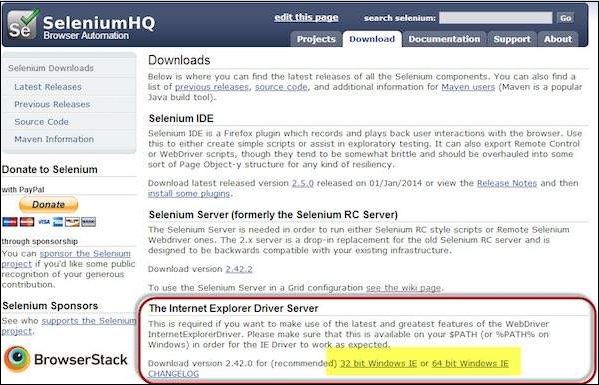
Step 6 : Launch IE using the following command.
c:
java -Dwebdriver.ie.driver=E:\Dropbox\Java and Selenium\IEDriverServer.exe -jar E:\Dropbox\Java and Selenium\selenium-server-standalone-2.42.2.jar -role webdriver -hub http://localhost:4444/grid/register -browser browserName=ie,platform=WINDOWS -port 5558
OR
e:
cd E:\Dropbox\Java and Selenium\
java -jar selenium-server-standalone-2.42.2.jar -role webdriver -hub http://localhost:4444/grid/register -browser browserName="internet explorer",version=11.0,platform=WINDOWS  -port 5558 -Dwebdriver.internetexplorer.driver=E:\Dropbox\Java and Selenium\IEDriverServer.exe

OR
e:
cd E:\Dropbox\Java and Selenium\
java -jar selenium-server-standalone-2.42.2.jar -role webdriver -hub http://localhost:4444/grid/register -browser browserName="ie",platform=WINDOWS  -port 5558 -Dwebdriver.internetexplorer.driver=E:\Dropbox\Java and Selenium\IEDriverServer.exe


Where,
E:\Dropbox\Java and Selenium\IEDriverServer.exe = The location of the downloaded the IE Driver(on the Node Machine)
E:\Dropbox\Java and Selenium\selenium-server-standalone-2.42.2.jar = Location of the Selenium Server Standalone Jar File(on the Node Machine)
http://localhost:4444/ = IP Address of the Hub and 4444 is the port of the Hub
browserName = ie / internet explorer (Parameter to specify the Browser name on Nodes)
5558 = Port on which IE Node would be up and running.
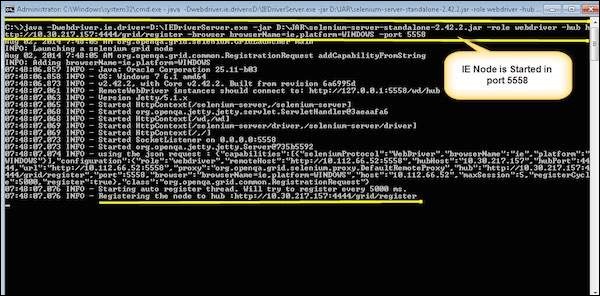
Step 7 : After executing the command, come back to the Hub. Navigate to the URL - http://10.30.217.157:4444 and the Hub would now display the IE node attached to it.

Step 8 : Let us now launch Chrome Node. For launching the Chrome Node, we need to have the Chrome driver downloaded on the node machine.
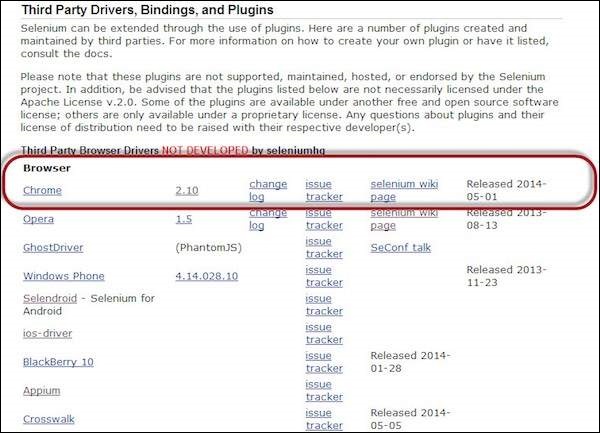
Step 9 : To download the Chrome Driver, navigate to http://docs.seleniumhq.org/download/ and then navigate to Third Party Browser Drivers area and click on the version number '2.10' as shown below.
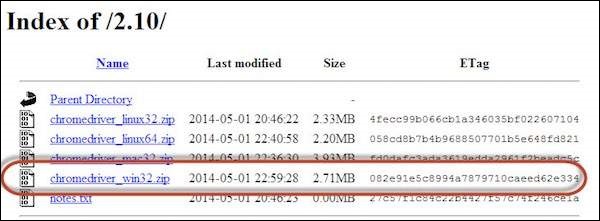
Step 10 : Download the driver based on the type of your OS. We will execute it on Windows environment, hence we will download the Windows Chrome Driver. After you have downloaded, unzip the exe file and place it in a folder which has to be referred while launching chrome nodes.
Step 11 : Launch Chrome using the following command.
C:\>java -Dwebdriver.chrome.driver=D:\chromedriver.exe -jar D:\JAR\selenium-server-standalone-2.42.2.jar -role webdriver -hub  http://10.30.217.157:4444/grid/register -browser browserName=chrome,platform=WINDOWS -port 5557

Where,
D:\chromedriver.exe = The location of the downloaded the chrome Driver(on the Node Machine)
D:\JAR\selenium-server-standalone-2.42.2.jar = Location of the Selenium Server Standalone Jar File(on the Node Machine)
http://10.30.217.157:4444 = IP Address of the Hub and 4444 is the port of the Hub
browserName = chrome (Parameter to specify the Browser name on Nodes)
5557 = Port on which chrome Node would be up and running.
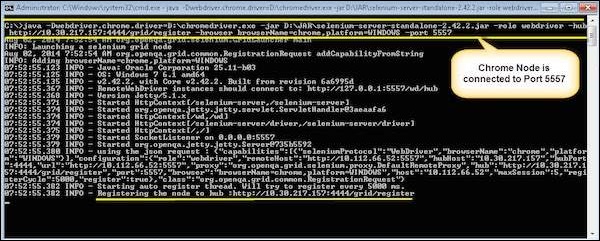
Step 12 : After executing the command, come back to the Hub. Navigate to the URL - http://10.30.217.157:4444 and the Hub would now display the chrome node attached to it.

Develop the Script and Prepare the XML File
Step 1 : We will develop a test using TestNG. In the following example, we will launch each one of those browsers using remote webDriver. It can pass on their capabilities to the driver so that the driver has all information to execute on Nodes.
The Browser Parameter would be passed from the "XML" file.
package TestNG;

import org.openqa.selenium.*;
import org.openqa.selenium.remote.RemoteWebDriver;
import org.openqa.selenium.remote.DesiredCapabilities;

import org.testng.annotations.AfterTest;
import org.testng.annotations.BeforeTest;
import org.testng.annotations.Parameters;
import org.testng.annotations.Test;

import java.net.URL;
import java.util.concurrent.TimeUnit;
import java.net.MalformedURLException;

public class TestNGClass
{
   public WebDriver driver;
   public String URL, Node;
   protected ThreadLocal<RemoteWebDriver> threadDriver = null;

   @Parameters("browser")
   @BeforeTest
   public void launchapp(String browser) throws MalformedURLException
   {
      String URL = "http://www.calculator.net";

      if (browser.equalsIgnoreCase("firefox"))
      {
         System.out.println(" Executing on FireFox");
         String Node = "http://10.112.66.52:5555/wd/hub";
         DesiredCapabilities cap = DesiredCapabilities.firefox();
         cap.setBrowserName("firefox");

         driver = new RemoteWebDriver(new URL(Node), cap);
         // Puts an Implicit wait, Will wait for 10 seconds before throwing exception
         driver.manage().timeouts().implicitlyWait(10, TimeUnit.SECONDS);

         // Launch website
         driver.navigate().to(URL);
         driver.manage().window().maximize();
      }
      else if (browser.equalsIgnoreCase("chrome"))
      {
         System.out.println(" Executing on CHROME");
         DesiredCapabilities cap = DesiredCapabilities.chrome();
         cap.setBrowserName("chrome");
         String Node = "http://10.112.66.52:5557/wd/hub";
         driver = new RemoteWebDriver(new URL(Node), cap);
         driver.manage().timeouts().implicitlyWait(10, TimeUnit.SECONDS);

         // Launch website
         driver.navigate().to(URL);
         driver.manage().window().maximize();
      }
      else if (browser.equalsIgnoreCase("ie"))
      {
         System.out.println(" Executing on IE");
         DesiredCapabilities cap = DesiredCapabilities.chrome();
         cap.setBrowserName("ie");
         String Node = "http://10.112.66.52:5558/wd/hub";
         driver = new RemoteWebDriver(new URL(Node), cap);
         driver.manage().timeouts().implicitlyWait(10, TimeUnit.SECONDS);

         // Launch website
         driver.navigate().to(URL);
         driver.manage().window().maximize();
      }
      else
      {
         throw new IllegalArgumentException("The Browser Type is Undefined");
      }
   }

   @Test
   public void calculatepercent()
   {
      // Click on Math Calculators
      driver.findElement(By.xpath(".//*[@id='menu']/div[3]/a")).click();
      // Click on Percent Calculators
      driver.findElement(By.xpath(".//*[@id='menu']/div[4]/div[3]/a")).click();
      // Enter value 10 in the first number of the percent Calculator
      driver.findElement(By.id("cpar1")).sendKeys("10");
      // Enter value 50 in the second number of the percent Calculator
      driver.findElement(By.id("cpar2")).sendKeys("50");

      // Click Calculate Button driver.findElement(By.xpath(".//*[@id='content']/table/tbody/tr/td[2]/input")).click();
      // Get the Result Text based on its xpath
      String result = driver.findElement(By.xpath(".//*[@id='content']/p[2]/span/font/b")).getText();
      // Print a Log In message to the screen
      System.out.println(" The Result is " + result);
      if(result.equals("5"))
      {
         System.out.println(" The Result is Pass");
      }
      else
      {
         System.out.println(" The Result is Fail");
      }
   }

   @AfterTest
   public void closeBrowser()
   {
      driver.quit();
   }
}
Step 2 : The Browser parameter will be passed using XML. Create an XML under the project folder.
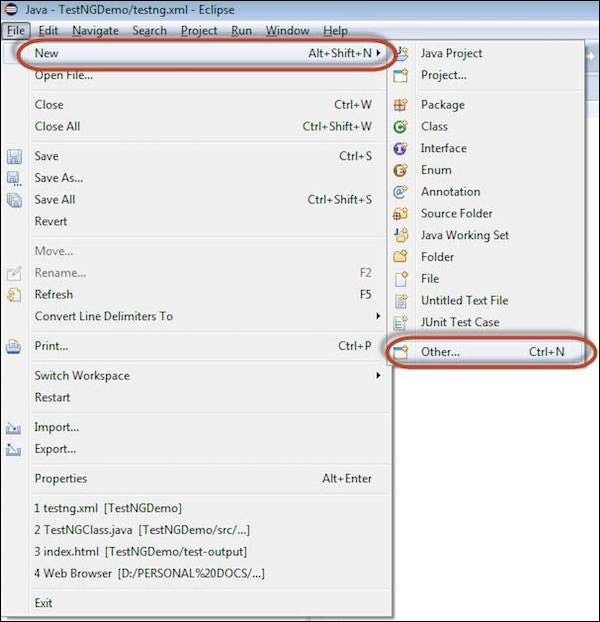
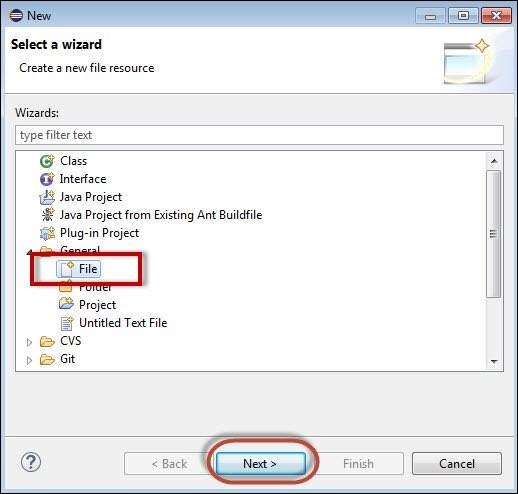
Step 3 : Select 'File' from 'General' and click 'Next'.
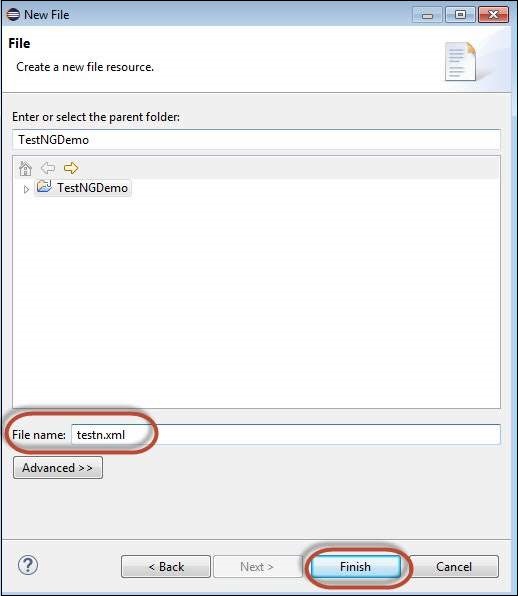
Step 4 : Enter the name of the file and click 'Finish'.
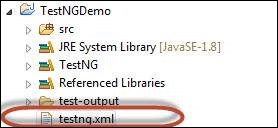
Step 5 : TestNg.XML is created under the project folder as shown below.
Step 6 : The contents of the XML file are shown below. We create 3 tests and put them in a suite and mention parallel="tests" so that all the tests would be executed in parallel.
<?xml version="1.0" encoding="UTF-8"?>
<!DOCTYPE suite SYSTEM "http://testng.org/testng-1.0.dtd">
<suite name="Suite" parallel="tests">

   <test name="FirefoxTest">
   <parameter name="browser" value="firefox" />
      <classes>
         <class name="TestNG.TestNGClass" />
      </classes>
   </test>

   <test name="ChromeTest">
   <parameter name="browser" value="chrome" />
      <classes>
         <class name="TestNG.TestNGClass" />
      </classes>
   </test>

   <test name="IETest">
   <parameter name="browser" value="ie" />
      <classes>
         <class name="TestNG.TestNGClass" />
      </classes>
   </test>

</suite>
Test Execution
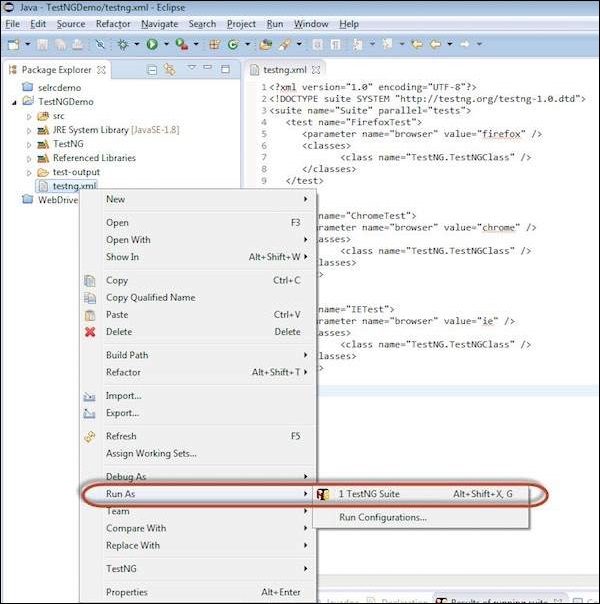
Step 1 : Select the created XML; right-click and choose 'Run As' >> 'TestNG Suite'.
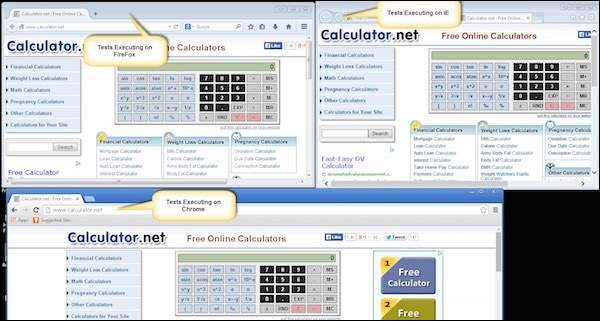
Step 2 : Now open the Node, where we have launched all the browser nodes. You will see all the three browsers in execution simultaneously.
Result Analysis
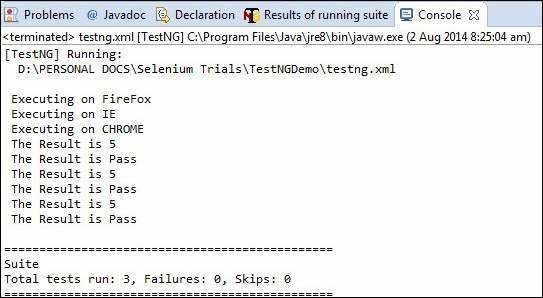
Step 1 : Upon completing the execution, we can analyze the result like any other execution. The result summary is printed in the console as shown in the following snapshot.
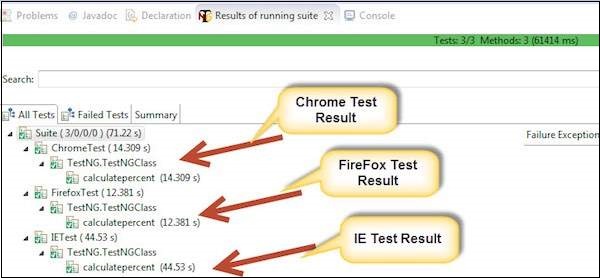
Step 2 : Navigate to the 'Results of Running Suite' Tab and TestNG would display the result summary as shown below.
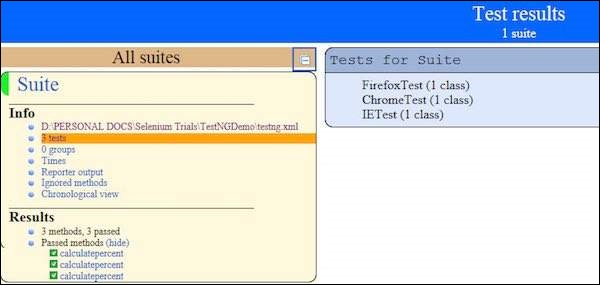
Step 3 : Upon generating the HTML, we will be able to see the test results in HTML format.
Thanks for the useful post, I had written an article with reference to this., Selenium Grid http://www.bestseleniumtraininginchennai.in/selenium-grid/ - Thanks for helping me out.
ReplyDeleteThank you for your information. It very nice article.
ReplyDeleteSelenium Training in Pune
This comment has been removed by the author.
ReplyDeleteNice article about selenium grid.The lot of concepts cover this post well.Really useful thanks for sharing..keep update best selenium training in chennai
ReplyDeletebest selenium training institute in chennai
Training with placement in chennai